Install · Excel add-in
Get Axmo
Axmo is a Microsoft Excel add-in. The simplest way to get it is from Microsoft AppSource — one click, and it updates itself. If your organisation manages add-ins centrally, or blocks the Office Store, there are two other routes below.
Get it from AppSource
The simplest way is to do it without leaving Excel: Home → Add-ins, search for Axmo, and click Add.
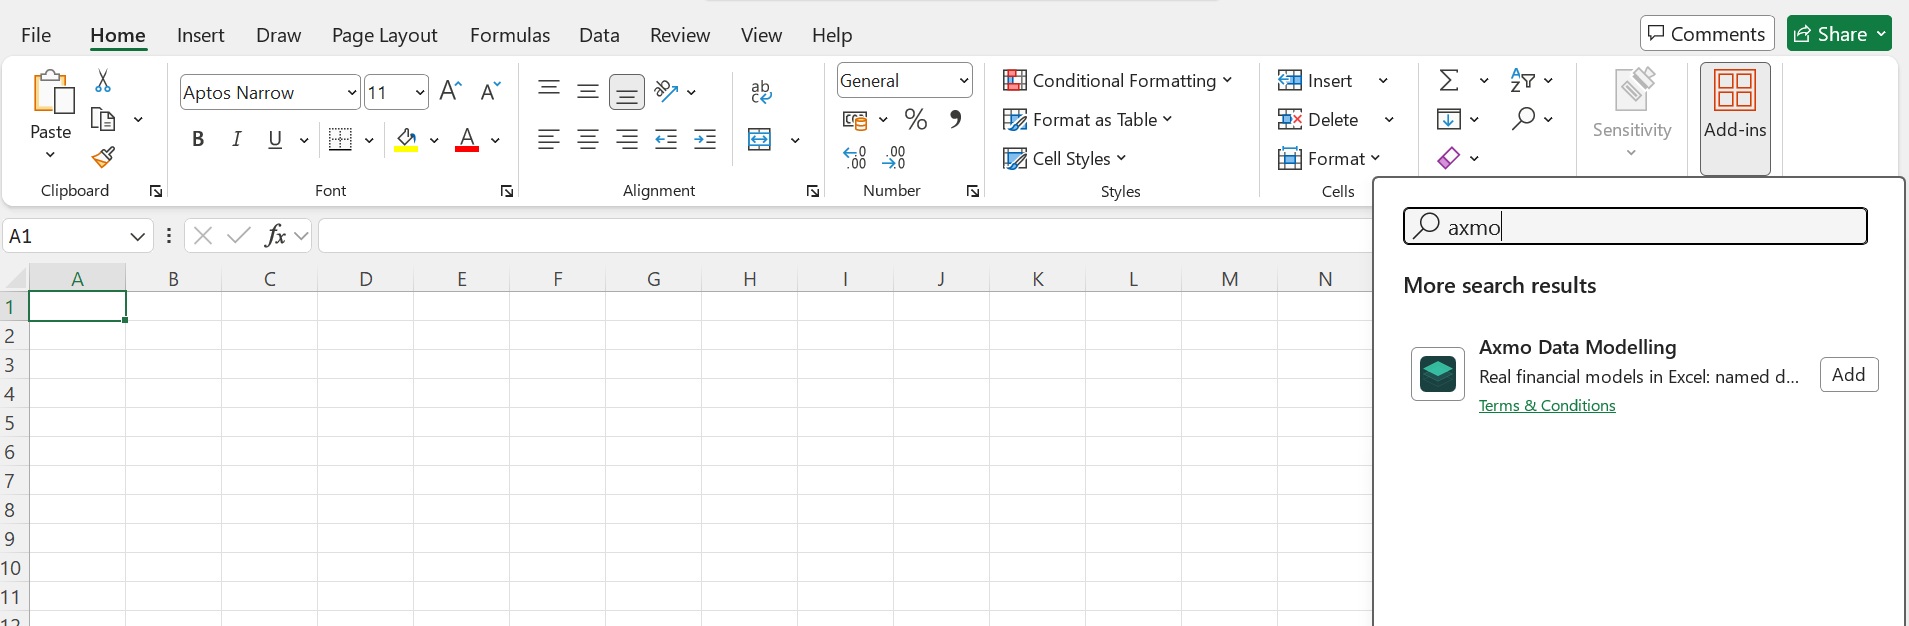
Or install it from Microsoft AppSource:
Get Axmo on Microsoft AppSource →
Click Get it now, and Excel opens with Axmo installed. Updates arrive on their own; there is nothing to download and nothing to re-install.
If the store isn't an option
Some organisations restrict the Office Store. Two routes work in that case, and which one you need depends on whether you can talk to whoever manages Microsoft 365.
-
My IT team manages add-ins
An admin can deploy Axmo to everyone, or to specific groups, with no per-user setup — including in tenants where users can't install anything themselves.
Have IT deploy it → -
I want to install it manually
Sideloading works on any Excel and needs nobody's permission. It's more hands-on, and it's also how you'd run a pre-release build.
Install it yourself →
For IT admins: deploy Axmo across your organisation
If add-ins are managed centrally, an admin can deploy Axmo to everyone — or to specific groups — with no per-user setup. The add-in then appears in Excel automatically the next time it starts, and code updates roll out on their own. This works even in locked-down tenants where users can't install add-ins themselves.
Deployment steps
Microsoft 365 admin center → Settings → Integrated apps → Add-ins → then either:
- Deploy from Microsoft Marketplace — search for Axmo, or
- Provide the manifest — upload manifest.prod.xml, or point at its URL: https://addin-modeling.axmo.it/manifest.prod.xml
Then assign to Everyone or specific groups → Deploy.
Propagation can take up to ~24 hours. Code updates roll out automatically; a manifest change that alters the Excel ribbon requires the admin to re-deploy the updated manifest.
Install it yourself
First, download the Axmo manifest — the small file that tells Excel where to find the add-in:
Sideloading is Microsoft's own mechanism for loading an add-in from a file rather than the store. It's real and it works — it's simply more hands-on than one click, and the manifest lives on your machine rather than being managed for you.
Excel on the web easiest — start here
Home → Add-ins → More Settings → Upload My Add-in → browse to the manifest you downloaded → Upload.
The manifest is stored in your browser's local storage, so clearing your cache or switching browser means uploading it again.
Excel on Windows (desktop)
- Save the manifest into a folder, then share that folder (right-click → Properties → Sharing).
- In Excel: File → Options → Trust Center → Trust Center Settings → Trusted Add-in Catalogs.
- Paste the folder's network path as the Catalog URL, click Add catalog, tick Show in Menu, then OK.
- Restart Excel. Then: Home → Add-ins → Advanced (or Insert → My Add-ins) → Shared Folder → select Axmo → Add.
This is the fiddliest route — it's a Windows/Office requirement, not an Axmo one.
Excel on Mac (desktop)
-
Copy the manifest into:
/Users/<username>/Library/Containers/com.microsoft.Excel/Data/Documents/wef(create the wef folder if it isn't there). - Restart Excel, then: Home → Add-ins (or My Add-ins) → select Axmo.
Once it's installed
Look for the Axmo Model tab on the Excel ribbon.
Add-ins installed from the store don't open their own panel — that's a Microsoft behaviour, not an Axmo one. In the View group, click Show Panel. Nothing appears until you do.
Then click Load Demo, choose the P&L model, and confirm — you'll have a real, working model to explore in seconds. From there, change an input and press Update to see it recalculate.
Your model and your data stay yours.